SCCM – Making InstallShield Setups Run Silently (Example: Epson Easy Interactive Tools)

Hey folks,

At my place of employ we recently rolled out several fancy new Epson interactive projectors and, with any equipment roll-out, they needed some software.  So, with my fresh copy of the Easy Interactive Software downloaded form the Epson website I quickly set about building a package.

Except none of the normal switches worked.

I eventually discovered that when running the installer it is a program within a program and the shell program silently unpacks the actual content into my user profile’s temp directory (C:\Users\UserName\AppData\Local\Temp).  I could see before it was an InstallShield installer but now that I had the actual files I was in business!

Except the usual “Setup.exe /s” didn’t work.

What I ended up having to do is run “Setup.exe /r” to run through the install in what is called a ‘record mode’ and at the end it generated a response file named Setup.iss in the Windows directory.

I grabbed this file, placed it with my found install files and when I ran the “Setup.exe /s” again it installed as it should.  I have not tried it yet but it should then be possible to generate a response file to perform a silent uninstall as well so you can run “Setup.exe /uninst /s”.

Hope this helps you!

SCCM – Remove People Button From the Task Bar in Windows 10 1709

Hey folks,

Quick one for now (will edit later)…  To remove the annoyingly-enabled-by-default People button in the Task Bar in Windows 10 1709, wrap the following code in a script and call it in your task sequence (I do these customizations at the end).

The code:

reg load "hku\Default" "C:\Users\Default\NTUSER.DAT" 
reg add "HKU\Default\SOFTWARE\Microsoft\Windows\CurrentVersion\Explorer\Advanced\People" /v PeopleBand /t Reg_DWORD /d 0 /f
reg unload "hku\Default"


Enjoy!

SCCM – Automatically Protecting Windows File Servers From Ransomware Using FSRM

Hi folks,

Perhaps the title is a bit misleading.  This is by no means the only protection to potentially have for a file server at risk of ransomware.  Not even close!  This is just one option to work in conjunction with existing security and, as always, should be regularly revisited.

This was prepared in response to WannaCry as an additional layer of protection and I’ve meant to post it for a while and am just getting to it now.

First I will post the code then some explanation…

The Code:

####
# FSRM_POWERSHELL_FINAL.PS1
# Created By: Neal Britton
#
#
# Credit where credit is due: http://www.scconfigmgr.com/2017/03/21/protect-file-servers-from-ransomware-with-sccm-cicb/
# Credit where credit is due: https://fsrm.experiant.ca/
# Credit where credit is due: https://github.com/nexxai/CryptoBlocker
#
#
####

################################ USER CONFIGURATION ################################

# Names to use in FSRM
$fileGroupName = "CryptoBlockerGroup"
$fileTemplateName = "CryptoBlockerTemplate"
# set screening type to
# Active screening: Do not allow users to save unathorized files
$fileTemplateType = "Active"
# Passive screening: Allow users to save unauthorized files (use for monitoring)
#$fileTemplateType = "Passive"

################################ END USER CONFIGURATION ################################

################################ FUNCTIONS ################################

Function ConvertFrom-Json20
{
 # Deserializes JSON input into PowerShell object output
 Param (
 [Object] $obj
 )
 Add-Type -AssemblyName System.Web.Extensions
 $serializer = New-Object System.Web.Script.Serialization.JavaScriptSerializer
 return ,$serializer.DeserializeObject($obj)
}

Function New-CBArraySplit
{
 <# 
 Takes an array of file extensions and checks if they would make a string >1Kb, 
 if so, turns it into several arrays
 #>
 param(
 $Extensions
 )

$Extensions = $Extensions | Sort-Object -Unique

$workingArray = @()
 $WorkingArrayIndex = 1
 $LengthOfStringsInWorkingArray = 0

# Take the items from the input array and build up a 
 # temporary workingarray, tracking the length of the items in it and future commas
 $Extensions | ForEach-Object {

if (($LengthOfStringsInWorkingArray + 1 + $_.Length) -gt 1023) 
 { 
 # Adding this item to the working array (with +1 for a comma)
 # pushes the contents past the 1Kb limit
 # so output the workingArray
 [PSCustomObject]@{
 index = $WorkingArrayIndex
 FileGroupName = "$Script:FileGroupName$WorkingArrayIndex"
 array = $workingArray
 }
 
 # and reset the workingArray and counters
 $workingArray = @($_) # new workingArray with current Extension in it
 $LengthOfStringsInWorkingArray = $_.Length
 $WorkingArrayIndex++

}
 else #adding this item to the workingArray is fine
 {
 $workingArray += $_
 $LengthOfStringsInWorkingArray += (1 + $_.Length) #1 for imaginary joining comma
 }
 }

# The last / only workingArray won't have anything to push it past 1Kb
 # and trigger outputting it, so output that one as well
 [PSCustomObject]@{
 index = ($WorkingArrayIndex)
 FileGroupName = "$Script:FileGroupName$WorkingArrayIndex"
 array = $workingArray
 }
}

function CryptoBlocker
{

$SMTPServer = "server name"
 $SMTPFrom = "$env:COMPUTERNAME@domain name"
 $SMTPTo = "help desk email"
 $AdminEmail = "help desk email"

# Get all drives with shared folders, these drives will get FRSRM protection
 $DrivesContainingShares = @(Get-WmiObject Win32_Share | # all shares on this computer, filter:
 Where-Object { $_.Type -eq 0 } | # 0 = disk drives (not printers, IPC$, C$ Admin shares)
 Select-Object -ExpandProperty Path | # Shared folder path, e.g. "D:\UserFolders\"
 ForEach-Object { 
 ([System.IO.DirectoryInfo]$_).Root.Name # Extract the driveletter, as a string
 } | Sort-Object -Unique) # remove duplicates

if ($drivesContainingShares.Count -eq 0)
 {
 # No drives containing shares were found
 exit
 }

#Write-Host "`n####"
 #Write-Host "The following shares needing to be protected: $($drivesContainingShares -Join ",")"

# Identify Windows Server version, and install FSRM role
 $majorVer = [System.Environment]::OSVersion.Version.Major
 $minorVer = [System.Environment]::OSVersion.Version.Minor

#Write-Host "`n####"
 #Write-Host "Checking File Server Resource Manager.."

Import-Module ServerManager

if ($majorVer -eq 10)
 {
 $checkFSRM = Get-WindowsFeature -Name FS-Resource-Manager

if ($minorVer -ge 0 -and $checkFSRM.Installed -ne "True")
 {
 #Server 2016

$install = Install-WindowsFeature -Name FS-Resource-Manager -IncludeManagementTools
 if ($? -ne $True)
 {
 #Install of FSRM failed
 exit
 }
 }
 }
 elseif ($majorVer -eq 6)
 {
 $checkFSRM = Get-WindowsFeature -Name FS-Resource-Manager

if ($minorVer -ge 2 -and $checkFSRM.Installed -ne "True")
 {
 # Server 2012 or 2012 R2

$install = Install-WindowsFeature -Name FS-Resource-Manager -IncludeManagementTools
 if ($? -ne $True)
 {
 #Install of FSRM failed
 exit
 }
 }
 elseif ($minorVer -ge 1 -and $checkFSRM.Installed -ne "True")
 {
 # Server 2008 R2
 $install = Add-WindowsFeature FS-FileServer, FS-Resource-Manager
 if ($? -ne $True)
 {
 #Install of FSRM failed
 exit
 }
 
 }
 elseif ($checkFSRM.Installed -ne "True")
 {
 # Server 2008
 $install = &servermanagercmd -Install FS-FileServer FS-Resource-Manager
 if ($? -ne $True)
 {
 #Install of FSRM failed
 exit
 }
 }
 }
 else
 {
 # Assume Server 2003
 return
 }

# Download list of CryptoLocker file extensions
 $webClient = New-Object System.Net.WebClient
 $jsonStr = $webClient.DownloadString("https://fsrm.experiant.ca/api/v1/get")
 $monitoredExtensions = @(ConvertFrom-Json20 $jsonStr | ForEach-Object { $_.filters })

# Process SkipList.txt
 If (Test-Path .\SkipList.txt)
 {
 $Exclusions = Get-Content .\SkipList.txt | ForEach-Object { $_.Trim() }
 $monitoredExtensions = $monitoredExtensions | Where-Object { $Exclusions -notcontains $_ }

}
 Else 
 {
 #
 # Add one filescreen per line that you want to ignore
 #
 # For example, if *.doc files are being blocked by the list but you want 
 # to allow them, simply add a new line in this file that exactly matches 
 # the filescreen:
 #
 # *.doc
 #
 # The script will check this file every time it runs and remove these 
 # entries before applying the list to your FSRM implementation.
 #
 # In our environment we have a large number of false positives on *.one and WindowsApplication1.exe files
 #
 $emptyFile = @'
*.acc
*.one
WindowsApplication1.exe
'@
 Set-Content -Path .\SkipList.txt -Value $emptyFile
 }

# Split the $monitoredExtensions array into fileGroups of less than 4kb to allow processing by filescrn.exe
 $fileGroups = @(New-CBArraySplit $monitoredExtensions)
 $screenArgs = @()

# Perform these steps for each of the 1KB limit split fileGroups
 ForEach ($group in $fileGroups)
 {
 $FGExists = Get-FsrmFileGroup | Where-Object { $_.Name -eq "$($group.fileGroupName)" }
 if ($FGExists -gt $null)
 {
 Remove-FSRMFileGroup -name $($group.fileGroupName) -Confirm:$false | Out-Null
 }
 
 New-FSRMFileGroup -name $($group.fileGroupName) -IncludePattern $($group.array) -Description "Crypto Extension Detection" | Out-Null

$screenArgs += $($group.fileGroupName)
 }

# Create File Screen Template with Notification
 # Remove existing if found and create new
 $FSTExists = Get-FsrmFileScreenTemplate | Where-Object { $_.Name -eq "CryptoExtensions" }

if ($FSTExists -gt $null)
 {
 Remove-FsrmFileScreenTemplate -Name CryptoExtensions -Confirm:$false | Out-Null
 }

$screenArgList = [String[]]@($screenArgs)

$EmailNotification = New-FSRMAction -Type Email -Subject "Crypto File Activity Detected - $env:COMPUTERNAME" -Body "User [Source IO Owner] attempted to save [Source File Path] to [File Screen Path] on the [Server] server. This file is in violation of the [Violated File Group] file group. This file could be a marker for malware infection, and should be investigated immediately." -RunLimitInterval 30 -MailTo $SMTPTo
 $EventNotification = New-FSRMAction -Type Event -EventType Error -Body "User [Source IO Owner] attempted to save [Source File Path] to [File Screen Path] on the [Server] server. This file is in violation of the [Violated File Group] file group. This file could be a marker for malware infection, and should be investigated immediately." -RunLimitInterval 30

New-FsrmFileScreenTemplate -Name CryptoExtensions -Description "Known CryptoLocker File Extesions" -IncludeGroup($($screenArgList)) -Active:$true -Notification $EmailNotification,$EventNotification | Out-Null


# Create File Screens for every drive containing shares
 $drivesContainingShares | ForEach-Object {
 # Skip C:
 # All actual shares on our File Servers are on other drives. We only care about these.
 if ($_ -ne "C:\")
 {
 $drive = $_

# Remove File Screen is exists and create new
 $FSExists = Get-FsrmFileScreen | Where-Object { $_.Path -eq $drive }
 
 if ($FSExists -gt $null)
 {
 Remove-FsrmFileScreen -Path $_ -Confirm:$false | Out-Null
 }
 
 New-FSRMFileScreen -Path $_ -Active: $true -Description "Crypto Extension Monitoring" -Template CryptoExtensions -Notification $EmailNotification,$EventNotification | Out-Null
 }
 }

# Check for FSRM File Screen and report TRUE or FALSE for Configuration Item/Baseline Reporting
 $CryptoScreen = Get-FSRMFileScreen | Where-Object { $_.Description -eq "Crypto Extension Monitoring" }
 
 if ($CryptoScreen -gt $null)
 {
 $CryptoCICompliant = $true
 }
 else
 {
 $CryptoCICompliant = $false
 }
 Return $CryptoCICompliant
}

################################ END FUNCTIONS ################################

CryptoBlocker


The Explanation:

So, the above is just my implementation after finding similar items and expanding on them to meet my need.  It is not comprehensive and should definitely not stand alone.

Pros of this approach:

  • Automatic, just add a server to be protected to the collection this is deployed to
  • Can be regularly updated
  • The source list of ransomware files/extensions is somewhat trustworthy(?)
  • The protection groups are removed before they are rebuilt to ensure protection lists are up to date
  • Fast
  • No manual changes

Cons:

  • The source list is somewhat trustworthy
  • Is updated by manual submissions
  • Code has to be edited to exclude a certain file name or file extension (but only has to be done in one place)


The Implementation:

In your SCCM console in the Assets and Compliance work space, expand ‘Compliance Settings’ and in ‘Configuration Items’ create a new configuration item:

  1. In my example, give it a name of “CryptoBlocker FSRM Script” and hit next
  2. In Support Platforms, deselect all and the manually select your server platforms.  for me it was Server 2012, Server 2012 R2, and Server 2016
  3. Create a new setting
    1. Name = “CryptoBlocker FSRM Script”
    2. Setting Type: Script
    3. Data Type: Boolean
    4. Discovery Script (Powershell): Use above script
  4. Create a new compliance rule
    1. Name = “Crypto FSRM Protection
    2. Selected setting = The one we just created
    3. Set value returned by the specified script to equals true
    4. Check to enable “Remote noncompliance if this setting instance is not found”

Next, in Configuration Baselines, create a new baseline:

  1. Name = “Crypto File Block”
  2. Evaluation Conditions: Add the Configuration Item we created earlier

Deploy to a test collection first!  Pictures of the finished configuration item are as follows:

fsrm_ci1fsrm_ci2fsrm_ci3fsrm_ci4fsrm_ci5

SCCM – Enabling ‘Easy’ Local Login on Domain Computers During OSD Part 2 of 2: Applying The Info

Hello folks!

Link to Part 1: SCCM – Enabling ‘Easy’ Local Login on Domain Computers During OSD Part 1 of 2: Getting The Info

In my organization we have need for the occasional machine to be configured with local login for such things as display computers or book sign-out machines in a library.  Local login is easy, but having to revisit the machine after imaging to set it up is annoying and, frankly, a waste of time.  Unfortunately we hadn’t been successful or too interested in solving this.  Until now that is.

WARNING: This will be highly specific (yet generalized) to our implementation.  It is my hope that somehow you find some use out of this.

Part 1 will cover getting the info at the start of your task sequence while Part 2 will cover the application of the info to the machine.

Credit where credit is due: https://www.scconfigmgr.com/2014/06/06/prompt-for-ou-location-during-osd-with-powershell/ was where the start of this all came from.

Here we go…

The code (Set-LocalUserInfo.ps1)….

Import-Module -name .\policyfileeditor.psm1

$u2 = New-Object -COMObject Microsoft.SMS.TSEnvironment
$u = $u2.Value("LocalUserName")

$l2 = New-Object -COMObject Microsoft.SMS.TSEnvironment
$l = $l2.Value("LocalUserLocation")

# Set simple password of username x2 if username is short
if ($u -ne "long user name")
{
 $pass = $u + $u
}
else
{
 $pass = $u
}

$n = switch ($l)
{
 "A location" {"123"}
 "Another location" {"456"}
 "One more" {"789"}
}

# Website variable to be set
$website = "https://mywebsite.whatev?page=" + $n

# Create the local user
NET USER $u $pass /ADD /expires:never

# Set the above local user to not have an expiring password
Get-WmiObject Win32_UserAccount -filter "LocalAccount=True"|?{$_.name -eq $u} |Set-WmiInstance -Arguments @{PasswordExpires=$false}

# Create registry keys for local login
New-ItemProperty -Path "HKLM:\SOFTWARE\Microsoft\Windows NT\CurrentVersion\Winlogon" -Name "DefaultUserName" -PropertyType "String" -Value $u
New-ItemProperty -Path "HKLM:\SOFTWARE\Microsoft\Windows NT\CurrentVersion\Winlogon" -Name "DefaultPassword" -PropertyType "String" -Value $pass
New-ItemProperty -Path "HKLM:\SOFTWARE\Microsoft\Windows NT\CurrentVersion\Winlogon" -Name "DefaultDomainName" -PropertyType "String" -Value '.\'
New-ItemProperty -Path "HKLM:\SOFTWARE\Microsoft\Windows NT\CurrentVersion\Winlogon" -Name "AutoAdminLogon" -PropertyType "String" -Value '1'

Remove-ItemProperty -Path "HKLM:\SOFTWARE\Microsoft\Windows NT\CurrentVersion\Winlogon" -Name "AutoLogonSID"

# If this computer is going to be for display, we don't want to show a website automatically when it logs on
# However, if the other alternative is a book lookup website, then we do want to fire up IE on login
if ($u -ne "display computer or whatever")
{
 New-ItemProperty -Path "HKLM:\SOFTWARE\Microsoft\Windows\CurrentVersion\Run" -Name "IEXPLORE" -PropertyType "String" -Value '"C:\Program Files\Internet Explorer\iexplore.exe"'
}

# Set the power scheme to High Performance on logon to ensure the system stays on (which we want in this case)
New-ItemProperty -Path "HKLM:\SOFTWARE\Microsoft\Windows\CurrentVersion\Run" -Name "SetMaximumPower" -PropertyType "String" -Value "C:\Windows\System32\powercfg.exe /SETACTIVE 8c5e7fda-e8bf-4a96-9a85-a6e23a8c635c"

# Specify local group policy file locations
$UserDir = "C:\windows\system32\GroupPolicy\User\registry.pol"
$MachineDir = "C:\windows\system32\GroupPolicy\Machine\registry.pol"

# Specify variables for setting screen saver (user setting)
$ScrnSvrPath = 'Software\Policies\Microsoft\Windows\Control Panel\Desktop';
$ScrnSvrName = 'SCRNSAVE.EXE'
$ScrnSvrData = 'scrnsave.scr'
$ScrnSvrType = 'String'
$ScrnSvrTimeoutName = 'ScreenSaveTimeOut'
$ScrnSvrTimeoutData = '120'

# Specify variables for disabling password prompt on computer wake (machine setting)
$RegPath = 'Software\Policies\Microsoft\Power\PowerSettings\0e796bdb-100d-47d6-a2d5-f7d2daa51f51'
$RegName = 'ACSettingIndex'
$RegName2 = 'DCSettingIndex'
$RegData = '0'
$RegType = 'DWord'

# Write settings to the local group policy
Set-PolicyFileEntry -Path $MachineDir -Key $RegPath -ValueName $RegName -Data $RegData -Type $RegType
Set-PolicyFileEntry -Path $MachineDir -Key $RegPath -ValueName $RegName2 -Data $RegData -Type $RegType

# Force a specific screen saver
# Sets screensaver to blank
# ONLY IF THE LOCAL USER IS *NOT* A DISPLAY USER
if ($u -ne "display")
{
 #Set screen saver to blank
 Set-PolicyFileEntry -Path $UserDir -Key $ScrnSvrPath -ValueName $ScrnSvrName -Data $ScrnSvrData -Type $ScrnSvrType
 
 #Set screen saver timeout to 2 minutes (120 seconds)
 Set-PolicyFileEntry -Path $UserDir -Key $ScrnSvrPath -ValueName $ScrnSvrTimeoutName -Data $ScrnSvrTimeoutData -Type $ScrnSvrType
}

# Prevent power plan turning off display after x minutes
# Sets value (in seconds) to 0 (disabled)
# ONLY IF THE LOCAL USER IS A DISPLAY USER
if ($u -eq "display")
{
 New-ItemProperty -Path "HKLM:\SOFTWARE\Microsoft\Windows\CurrentVersion\Run" -Name "AC_TurnOffDisplayAfter" -PropertyType "String" -Value "C:\Windows\System32\powercfg.exe -setacvalueindex 8c5e7fda-e8bf-4a96-9a85-a6e23a8c635c 7516b95f-f776-4464-8c53-06167f40cc99 3c0bc021-c8a8-4e07-a973-6b14cbcb2b7e 0"
 New-ItemProperty -Path "HKLM:\SOFTWARE\Microsoft\Windows\CurrentVersion\Run" -Name "DC_TurnOffDisplayAfter" -PropertyType "String" -Value "C:\Windows\System32\powercfg.exe -setdcvalueindex 8c5e7fda-e8bf-4a96-9a85-a6e23a8c635c 7516b95f-f776-4464-8c53-06167f40cc99 3c0bc021-c8a8-4e07-a973-6b14cbcb2b7e 0"
}

# Load ntuser.dat (default user)
reg load "HKEY_LOCAL_MACHINE\defuser" "C:\users\default\ntuser.dat"
# Create a new key to control local user website, close the handle, and trigger garbage collection
Set-ItemProperty -Path "HKLM:\defuser\SOFTWARE\Microsoft\Internet Explorer\Main" -Name "Start Page" -Value $website
[gc]::Collect()
#Unload ntuser.dat
reg unload "HKEY_LOCAL_MACHINE\defuser"


It is ugly, I know.  Truth be told, I’m hacking and slashing my way to a working solution just like I do in C# and after it works you don’t really want to mess with it.

Part of the code above is setting local group policy options that were, for one reason or another, difficult or otherwise impossible to set programmatically.  I found http://brandonpadgett.com/powershell/Local-gpo-powershell/ which pointed me to a module that would allow me to set local group policy objects using Powershell.  Highly recommended and without the module my script would have been sunk and half-done.

Save the script in the same location as the script from Part 1 and include the Powershell module accessible from the above link in there as well.  Oh, as with the SConfigMgr link above, include the ServiceUI.exe executable from MDT.  My folder ended up looking like this:

folder

Add a “Run Powershell Script” step to the end of your task sequence and configure:

settsstep

and

settsstepsettings

Presto!

So far it is working flawlessly in my Windows 8.1 deployment and am in the process of testing for Windows 10.

SCCM – Enabling ‘Easy’ Local Login on Domain Computers During OSD Part 1 of 2: Getting The Info

Hello folks!

Link to Part 2: SCCM – Enabling ‘Easy’ Local Login on Domain Computers During OSD Part 2 of 2: Applying The Info

In my organization we have need for the occasional machine to be configured with local login for such things as display computers or book sign-out machines in a library.  Local login is easy, but having to revisit the machine after imaging to set it up is annoying and, frankly, a waste of time.  Unfortunately we hadn’t been successful or too interested in solving this.  Until now that is.

WARNING: This will be highly specific (yet generalized) to our implementation.  It is my hope that somehow you find some use out of this.

Part 1 will cover getting the info at the start of your task sequence while Part 2 will cover the application of the info to the machine.

Credit where credit is due: https://www.scconfigmgr.com/2014/06/06/prompt-for-ou-location-during-osd-with-powershell/ was where the start of this all came from.

Here we go…

The code (Get-LocalUserInfo.ps1)…

param(
[parameter(Mandatory=$true)]
[string]$RBOptionFirst,
[parameter(Mandatory=$true)]
[string]$RBOptionSecond,
[parameter(Mandatory=$true)]
[string]$RBOptionThird
)
 
function Load-Form {
 $LocationList = @("A location", "Another location", "One more")
 $Form.Controls.AddRange(@($RBOption1, $RBOption2, $RBOption3, $ComboBox, $Button, $GBSystem, $GBLocation))
 $ComboBox.Items.AddRange($LocationList)
 $Form.Add_Shown({$Form.Activate()})
 [void]$Form.ShowDialog()
}
 
function Set-UserLocation {
 param(
 [parameter(Mandatory=$true)]
 $Location
 )
 if ($RBOption1.Checked -eq $true) {
 $UserName = "$($RBOptionFirst)"
 }
 if ($RBOption2.Checked -eq $true) {
 $UserName = "$($RBOptionSecond)"
 }
 if ($RBOption3.Checked -eq $true) {
 $UserName = "$($RBOptionThird)"
 }
 $TSEnvironment = New-Object -COMObject Microsoft.SMS.TSEnvironment 
 $TSEnvironment.Value("LocalUserName") = "$($UserName)"

$TSEnvironment2 = New-Object -COMObject Microsoft.SMS.TSEnvironment 
 $TSEnvironment2.Value("LocalUserLocation") = "$($Location)"

$Form.Close()
}
 
# Assemblies
[void][System.Reflection.Assembly]::LoadWithPartialName("System.Drawing") 
[void][System.Reflection.Assembly]::LoadWithPartialName("System.Windows.Forms") 
 
# Form
$Form = New-Object System.Windows.Forms.Form 
$Form.Size = New-Object System.Drawing.Size(260,220) 
$Form.MinimumSize = New-Object System.Drawing.Size(360,220)
$Form.MaximumSize = New-Object System.Drawing.Size(360,220)
$Form.SizeGripStyle = "Hide"
$Form.StartPosition = "CenterScreen"
$Form.Icon = [System.Drawing.Icon]::ExtractAssociatedIcon($PSHome + "\powershell.exe")
$Form.Text = "Choose user details"
$Form.ControlBox = $false
$Form.TopMost = $true
 
# Group boxes
$GBSystem = New-Object System.Windows.Forms.GroupBox
$GBSystem.Location = New-Object System.Drawing.Size(10,10)
$GBSystem.Size = New-Object System.Drawing.Size(320,60)
$GBSystem.Text = "Select user"
$GBLocation = New-Object System.Windows.Forms.GroupBox
$GBLocation.Location = New-Object System.Drawing.Size(10,80)
$GBLocation.Size = New-Object System.Drawing.Size(220,60)
$GBLocation.Text = "Select location"
 
# Radio buttons
$RBOption1 = New-Object System.Windows.Forms.RadioButton
$RBOption1.Location = New-Object System.Drawing.Size(20,33)
$RBOption1.Size = New-Object System.Drawing.Size(100,20)
$RBOption1.Text = "$($RBOptionFirst)"
$RBOption1.Add_MouseClick({$ComboBox.Enabled = $true})
$RBOption2 = New-Object System.Windows.Forms.RadioButton
$RBOption2.Location = New-Object System.Drawing.Size(120,33)
$RBOption2.Size = New-Object System.Drawing.Size(100,20)
$RBOption2.Text = "$($RBOptionSecond)"
$RBOption2.Add_MouseClick({$ComboBox.Enabled = $true})
$RBOption3 = New-Object System.Windows.Forms.RadioButton
$RBOption3.Location = New-Object System.Drawing.Size(220,33)
$RBOption3.Size = New-Object System.Drawing.Size(100,20)
$RBOption3.Text = "$($RBOptionThird)"
$RBOption3.Add_MouseClick({$ComboBox.Enabled = $true})
 
# Combo Boxes
$ComboBox = New-Object System.Windows.Forms.ComboBox
$ComboBox.Location = New-Object System.Drawing.Size(20,105)
$ComboBox.Size = New-Object System.Drawing.Size(200,30)
$ComboBox.DropDownStyle = "DropDownList"
$ComboBox.Add_SelectedValueChanged({$Button.Enabled = $true})
$ComboBox.Enabled = $false
 
# Buttons
$Button = New-Object System.Windows.Forms.Button
$Button.Location = New-Object System.Drawing.Size(140,145)
$Button.Size = New-Object System.Drawing.Size(80,25)
$Button.Text = "OK"
$Button.Enabled = $false
$Button.Add_Click({Set-UserLocation -Location $ComboBox.SelectedItem.ToString()})
 
# Load Form
Load-Form


As the above link mentions, using this script requires that Microsoft .NET (WinPE-NetFx) and Windows PowerShell (WinPE-PowerShell) be added to your boot wim and (re)ristributed to your distribution points.

Save the above script to your package source location and create a package for it.  In my case, the name is ‘Set Local user Info’ and includes some other scripts and components which will be discussed in Part 2.

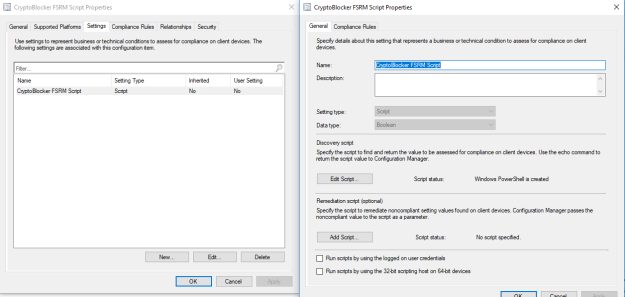
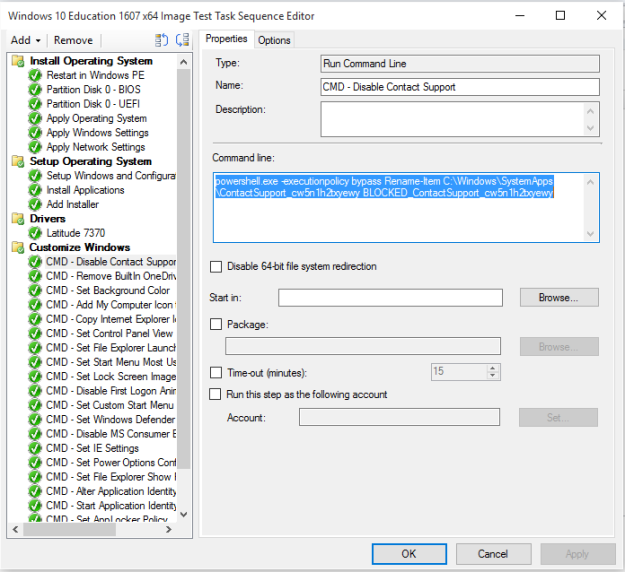
Create a “Run Command Line” task sequence step early in the TS list:

TSStep

And configure it as follows:

TSStep2

If all goes well, the following will appear when you begin your task sequence…

TSStep3

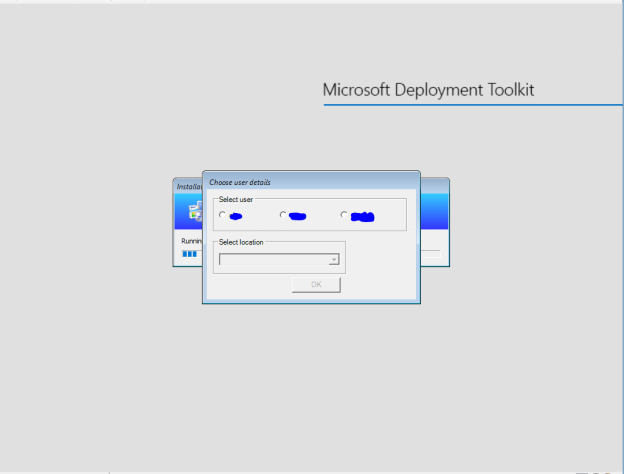
Selecting either of the three radio buttons allows the location drop down list to appear.  Select the name/type of user you passed via the command line and then pick the location (why this is offered is covered in Part 2).

Stay tuned for Part 2!

SCCM – Deploying .NET Framework 4.6.2 Fails With Error 16389

Hello everyone,

In preparation for some upcoming application deployments that rely on the latest .NET Framework I did a test deployment to a small (50-ish) collection of Windows 8.1 x64 laptops.

My .NET 4.6.2 setup is fairly simple: it’s in SCCM as an application using the full executable and my full install looks like this:

NDP462-KB3151800-x86-x64-AllOS-ENU.exe /q /norestart

Almost immediately I had a failure and they kept rolling in, all failing with a 16389.

Luckily, the fix was fairly simple…

After a quick look online I went into my application and in the ‘Program’ tab I had to click to enable the “Run installation and uninstall as 32-bit process on 64-bit clients.”.  D’oh!

There it is:

net4.6.2

Once that was clicked and redistributed out to the distribution points (just to be safe) the angry red failures have all disappeared!

SCCM – Set Windows 10 Desktop Background To Solid Colour (For All Users) During OSD

Hey everyone,

I’d like to preface this blog post by saying that this was perhaps the one setting that took the longest to figure out as there wasn’t much of anything about it online at the time and what was found just didn’t seem to work right.  Thankfully, after a whole bunch of trial and error and many reimagings of my VM the answer was finally at hand.

This script, as with most I have, runs during my image creation and during my actual OSD task sequence.  It is definitely unnecessary but after trying so hard to figure it out you just want to know that it is applying.

Anyway, my first step was to create a 1920×1080 img0.jpg file of the solid colour I wanted.  The file is img0.jpg because that is what the default background in Windows 10 is called.  I chose one of the lighter-blues that Windows let you choose from when setting a background.  This has traditionally been our background as it isn’t hard on the eyes and we haven’t bothered to change it.  Combined with ‘our colour’ being an off-lime green this is the better choice.

Second step is to create my loadSolidColourBackground.cmd script that contains the followinging…

takeown /f c:\windows\WEB\wallpaper\Windows\img0.jpg
takeown /f C:\Windows\Web\4K\Wallpaper\Windows\*.*
icacls c:\windows\WEB\wallpaper\Windows\img0.jpg /Grant System:(F)
icacls C:\Windows\Web\4K\Wallpaper\Windows\*.* /Grant System:(F)

del /q C:\Windows\Web\4K\Wallpaper\Windows\*.*
xcopy img0.jpg C:\Windows\Web\Wallpaper\Windows\ /Q /Y

Wrap all of these in a package in SCCM and you’re ready!

Add a “Run Command Line” step in your task sequence(s) pointing to your new package and run “cmd.exe /c loadSolidColourBackground.cmd”.

SCCM – Remove Built-In OneDrive From Windows 10 During OSD

Hi everyone,

One of the “features” on Windows 10 is, whether you’re going to use it or not, OneDrive is installed without asking for it (even if the first application install of your Task Sequence is Office and OneDrive for Business (or you bake it in during image creation)).

Anyway, it is pretty easy to get rid of but it involves editing the default user registry.  I made a blog post before this describing my basic method to do this: SCCM – Edit The Default User Registry

What I have is a “Install Command Line” step in my Task Sequence that runs “cmd.exe /c removeOneDrive.cmd”.  This script in turn gets made in SCCM as a package.  This is what is in that script…

reg load "hku\Default" "C:\Users\Default\NTUSER.DAT" 
reg delete HKU\default\software\Microsoft\Windows\CurrentVersion\Run /v OneDriveSetup /f
reg unload "hku\Default"

The majority of my scripts I run in both the image creation task sequence and my deployment task sequence, mainly so I am sure that at some point it was killed.

SCCM – Edit The Default User Registry

Hey everyone,

Hoping to do a few posts today but none of them are possible without a little fun tinkering with the registry.  Not just any registry but the default user registry.  **Inset obligatory warning about tinkering with the registry**

I do the registry editing via command line in .bat/.cmd files.

The basic format:

reg load "hku\Default" "C:\Users\Default\NTUSER.DAT" 
<registry editing>
reg unload "hku\Default"

And that is about it!  Until next time…

SCCM – Remove “Contact Support” From Windows 10 1607 During OSD

EDIT 03/22/2017:  As blogged HERE by Michael Niehaus it is possible to remove this pesky program via powershell with the following:

Get-WindowsCapability -online | ? {$_.Name -like '*ContactSupport*'} | Remove-WindowsCapability –online


Hi everyone,

It has been quite a while since my last blog post and a lot has been going on.  I’m going to slowly start posting new items as I find the time to show some of the things I’ve created (or found) for SCCM as I have been working towards creating a master Windows 10 image.

In this post, I will be talking about removing the questionable “Contact Support” app that Microsoft for some reason saw fit to include in the Enterprise and Education editions of Windows 10.

I was able to remove it with a simple powershell script running in a normal task sequence in a “Run Command Line” step.  I am opting to simply rename the folder it lies in instead of outright removing it because hey, who knows, one day it might be needed.

The script:

powershell.exe -executionpolicy bypass Rename-Item C:\Windows\SystemApps\ContactSupport_cw5n1h2txyewy BLOCKED_ContactSupport_cw5n1h2txyewy

That’s it!  This is what it fully looks like in the task sequence and the result:

sccm_cmdremovecontactsupportbyebyecontactsupport

Until next time…